It's a gorgeous day, the sun is shining and the snow is melting...it's going to be a good day! This morning, I finally had the time to use the new Cuttlebug 'All in One' Embossing system from Provo Craft, and take pictures so I can show you how easy it is to use this system.
The 'All in One' embossing system by Cuttlebug /Provo Craft offers the flexibility to place your designs wherever you want on your card or project. With 'regular' embossing folders design placement is determined by the embossing folder design.. As well as giving us the ability to place the design elements where we would like them, the 'All in One' embossing folder's larger size, (6" x 9") gives us the ability to work with A2 and 5 x 7" cards using the same design elements.
The 'All in One' embossing system consists of two parts... The 'embossing folder', and the design sets, which come in a storage case.
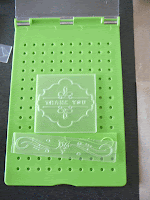
The 'Embossing Folder' has a grid of holes that you snap the designs into. You use it with all of the design sets.
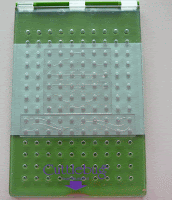
The folder and looks somewhat similar to the 'Emboss Plus' folder, except this folder is much thicker and sturdier. It consists of a 6" x 9" bottom (green) plate that has a grid of holes. The top part, or cover of the Embossing folder is attached to the top of the green 'bottom' with hinges. It is a thick solid, piece of acrylic that has a grid of holes that line up with the holes on the bottom green plate. The Embossing folder comes with a 2" design element.
Provo Craft has introduced eight design sets and two Monogram sets. The design sets come with ten design elements per set. There are two pieces to each design... a 'positive' and 'negative' part. (The two parts for each design fit together like the front and back of an embossing folder)
They aren't joined together on the side or top, and that's what gives them the versatility to be used anywhere on your card or project. Each design element has 'bumps' on the back of the embossed design that snaps into the holes on the embossing folder, holding them in place.
There are ten design elements in each set (except for the monogram sets, which have 30 designs). Included in each design set (excluding monogram sets) is a large 'background' design, which is 5 1/4" x 7 1/4" in size! This ensures we will have the background design continue right to the edge of our card when making larger cards or books.
I have to be honest, one of the biggest peeves I have, is embossing folders who's designs don't cover the whole card I'm making!...so I personally very happy with the larger size of these backgrounds. There are two pieces to each design, and they fit together like the designs on the top and bottom of the embossing folders that we are used to using.
All In One Embossing Instructions for use with Cuttlebug & Big Shot Machines
Place the positive (green) plate of the design element onto the bottom of the folder (green). Press til you hear a snap. (the bumps on the back of the plate will snap into the holes). The plate should be flat against the bottom green plate.
Align the negative (clear) plate of the design onto the green, positive piece, making sure you match the design and edges of green piece. Close the folder, pressing til you hear a click (the bumps on the clear piece has now snapped into the holes on the folder cover).
Open the folder, and insert your cardstock. What I find helpful, with the clear top of the designs and folder, you can see to position and straighten your cardstock,
For Cuttlebug Machine: Place two B plates on top of the closed folder, (NOTE: there is an arrow on folder showing which end to put through machine first)and run through Cuttlebug machine.
For Big Shot machine: Place two cutting/embossing plates on top of embossing folder and put through machine (without multi
purpose platform)
The folder packaging has instructions for Letterpress printing, embossing and Debossing.
I Do have one suggestion......(I know this from personal experience, lol) When you place your top design over the bottom one, be absolutely sure that you have it with the design matching exactly (top of bottom design and top of top design matching) ....Twice, with two different design elements, the majority of it embossed beautifully...but a small part didn't.....Because these flourishes, etc are symmetrical, they may match exactly, except for one little leaf or swirl....I had the top design 'upside down'.....I couldn't believe that this happened TWICE!! The first time it took me almost 30 minutes of playing with the 'sandwich', and adding shims, thinking that was the problem, before it dawned on me that maybe it was mis-matched design elements.
You'd think I'd have learned the first time, noooooo, the next card I did, I had a flourish wrong.....lol....I couldn't figure out why everything looked so beautifully embossed, except for one tiny area....that is the area where the design on the bottom wasn't the same as the part of the design on top....
To view the Cuttlebug All In One Embossing system by Provo Craft, visit 2011 Cuttlebug & Craft-too new releases. They can be found on page two (at the bottom of the page) and page three
Couture Creations & Craft Concepts Embossing folders
I just received an email that the Craft Concepts have arrived in Canada! The Couture Creations are expected to arrive in 2-3 weeks.
Craft Concepts is the Australian company who releases limited numbers of each embossing folder design. They 'do' one manufacturing run of a design line, then it is discontinued and they design and manufacture another set of designs, and after one manufacturing run, it is discontinued. This is the company I had mentioned in an earlier post that will force me to quit 'sitting on the fence' when it comes to buying embossing folders for myself, lol
I was also informed that Craft Concepts are taking pre-orders for Ten new embossing folder designs that are slated to arrive on May 10th (Wow! they even gave an exact date this time!) They have also given us notice of Twenty new embossing folder designs that will be arriving in July / August.
I'll be putting all of the new designs and pre-orders in my Online Catalog, under the category 2011 Cuttlebug & Craft-too embossing folders. (I'm putting all of the embossing folders in that area, regardless of the company that makes them). I'll be posting the expected arrival date (ETA) with each folder so you know when to expect each folder to arrive.
Of course, I'll be taking pre-orders, and you can contact me by emailing me at the email address shown in the left side bar, and in my online catalog. (ordering address is shown at the top of each page, as well as the main page of the Online Catalog).
In my online catalog, you will find a few different categories that have embossing folders in. (from Tim Holtz, Sizzix, Craft-too (from United Kingdom). Some of you are aware that I'm currently getting a website built, and we're waiting on the shopping cart to be done. Because I don't want to confuse the issue by moving products around, I've kept Cuttlebug & Craft-Too Embossing folders in the 2010 Cuttlebug & Craft-Too category.
If you have any questions about any of the items I've posted about today, or a product you have been looking for and can't find in your local Rubber Stamp Store, feel free to email me.
Now that I got this posted, I get to unpack boxes! I get to see the new releases that arrived at my door a few minutes ago! More of the Tim Holtz (new releases) embossing folders and dies have arrived, along with some Sizzix Embossing folders and Tim Holtz BIGZ dies. We've also received the cute mini Movers and Shapers as well as regular Embossing folder sets, ATC sized embossing folders and some of the Decorative strips and 'On the Edge' dies. i took a look at the packing slip, just to satisfy my curiosity....Now i get to see the goodies 'in person'.
I hope you have a wonderful evening, and weekend.
Thanks for visiting


7 comments:
Good gravy, so that's why I can't emboss. I wish they had instructions on their packages. Thank you so much for having this information available. I have been looking for nearly 24 hours on and off.
Me too Proudmoms! I had no idea what I needed or how I was to use these. Thanks for the post and the details Elaine. As there are no instuctions in the package. Nor any company logo on the plates so there was no way to get help. Thanks to Anne over at ATT for sending me here. I'll save the link to use, whenever I can purchase the grided folder needed to use the plates! In the meantime .....Arrggg.
I have had a lot of trouble with the alphabet letters...when you emboss them they leave stress marks. Any suggestions?
Sue
Reply for Sue- Avoiding stress marks on Alphabet-
Sue, I haven't used the Alphabet letters for this system. I've used the borders and corners I wonder if it isn't an issue with the weight of your cardstock. I used some light weight cardstock with one design, and had some 'bending' of the cardstock....I then used a 110#, cardstock and it seemed to be better.
Instructions For Cuttlebug All In One are on the MASTER FOLDER PACKAGING! NOT on the packaging for each of the sets of embossing 'images'. That is so stupid!
When you purchase the embossing designs, there are NO instructions on the back...
The MASTER FOLDER (which is the folder you put your templates into), on the back of the packaging, has ALL of the information. I don't know what ProvoCraft was thinking...Instructions should be with each of the sets of design images. I hope this helps
Elaine
Sorry am new to this. Is it possible to use these 'All In Ones' on the grand calibur at all? Have had a set for ages but don't have a cuttlebug.
Julie
Hi Jools,
I'll be honest, I don't know if you can use the All in One's with the Grand Calibur. Try contacting Spellbinders, they are great to work with, and I'm sure someone there could answer your question. You said you had a set of All In One's...I hope you have the Master Folder, (this is what you clip' the embossing plates into, then put your card stock in, and run the whole 'she-bang' through your embossing / machine.
I'm sorry I wasn't more help, but I don't have a Grand Calibur.
I have both a Cuttlebug and Big Shot...(but, I'm a Big Shot gal!)
Thanks for visiting and leaving a comment!
Elaine
Post a Comment